Friday, May 29, 2015

A Linnie Blooms Blog Hop

1908142_10203174247272098_6866324387937828000_n

At Linnie Blooms you're going to find oodles of fun projects to really take your mixed media in a new direction. We met this new company at CHA in January, and we immediately had heaps of ideas for using her clever products. What a new dimension to journals, canvases, books, scrapbook pages! We know you're going to love seeing the inspiration from this week's hop!
Plus there are prizes!! Three lucky winners will each win a set of Linnie Blooms Fabric Mini File Folders just like they provide for our team. Plus, you'll receive a Dreamweaver Stencil background, and our Vintage Press Perfectly Clear Stamps™ Set. You'll be creating Mixed Media fabric accents in no time! These winners have to have a U.S. mailing address (official rules here), but Aussie Fans - good news! The Stencil Specialists are sponsoring one Australian prize for this collaboration! You could win a Stampendous stamp, an LL sized Dreamweaver Stencil of your choice, a silicone buttons mould, and a Stampendous Embossing Powder (your color choice)... Wow!! Be sure to let us know you're from Australia in your comments!!

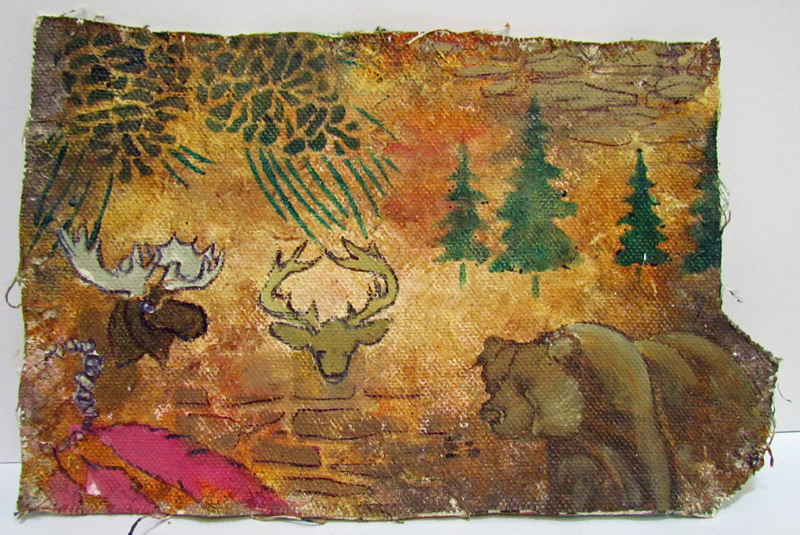
Today, I feature the conclusion of the Disney inspired project that I blogged about yesterday.  This project is really my first adventure with canvas.  I found that the more relaxed I was as I worked, the better the project turned out.  I am posting my favorite three today.  For all of them, I started by painting Gesso on the top of the Linnie Blooms canvas folders.  Then, I painted backgrounds with acrylic paint.  I stencilled with acrylic paint and a stencil brush.  The stencils I used for each are listed under the photos.


 The first one I am featuring today is based on Adventureland.  For it, I used LJ 815 Zebra Texture Stencil, LL 454 Long Bird O' Paradise,  LL 538 Primitive Masks, LG 642 Branch, LG 752 Toucan, and LG 706 Monstera Shape.

For this Liberty Square inspired project, I used  LL 525 Bats,  a retired LG 653 Columns (sorry.  I would have sworn it was still valid....), LG 699 Copperplate Corners, LL 359 Flag and the Stampendous stamp Crowscape Stamp.  I painted acrylic paint on the stamp instead of using ink.

Finally, I present this Tomorrowland inspired project.  Oddly, although I dreaded this one, it turned out to be one of my favorite.  For it, I used LJ 991 Gears, LM 289 Globe, LX 7017 Stars and LX 7029 Spiral Dots.
This project was really a lot of fun.  Pick up some of your favorite stencils and some Linnie Blooms canvas and give it a shot!  Better yet, leave a comment here and on all the other blogs and you could win some great stuff.
Let's take a look at the fun inspiration our design teams have for you today! Be sure to leave your comments for a chance to win!

Thursday, May 28, 2015

A Linnie Blooms Collaboration

1908142_10203174247272098_6866324387937828000_n

At Linnie Blooms you're going to find oodles of fun projects to really take your mixed media in a new direction. We met this new company at CHA in January, and we immediately had heaps of ideas for using her clever products. What a new dimension to journals, canvases, books, scrapbook pages! We know you're going to love seeing the inspiration from this week's hop!
Plus there are prizes!! Three lucky winners will each win a set of Linnie Blooms Fabric Mini File Folders just like they provide for our team. Plus, you'll receive a Dreamweaver Stencil background, and our Vintage Press Perfectly Clear Stamps™ Set. You'll be creating Mixed Media fabric accents in no time! These winners have to have a U.S. mailing address (official rules here), but Aussie Fans - good news! The Stencil Specialists are sponsoring one Australian prize for this collaboration! You could win a Stampendous stamp, an LL sized Dreamweaver Stencil of your choice, a silicone buttons mould, and a Stampendous Embossing Powder (your color choice)... Wow!! Be sure to let us know you're from Australia in your comments!!

Honestly, while I truly appreciate canvas mixed media projects, I have never really made anything like this myself.  I had no idea where to begin.  Finally, I decided that I had to think along the lines of what I loved--scrapbooking.  I created these projects and the ones for tomorrow to eventually insert under titles in my scrapbook.  And what do I like to scrapbook the most?  Disney.

Today, I offer you three of six mini canvases (actually the opened folders) based on lands in the Magic Kingdom.  I created all of the canvases by starting with a layer of gesso, and then adding a background of acrylic paints and stencilling over the top with acrylic paints and a stencil brush.  I added in details with an ordinary ball point pen.  I will list the stencils under each page.


 The first page represents Main Street.  The LL 3017 Cameo stencil represents the silhouettes that I used to get on Main Street as a keepsake.  I also used LG 684 Wrought Iron, LL 431 Sundae,  LG 698 Corner Flourishes, LM 149 Music, and, an apparently discontinued LG 632 Columns (sorry, when I used it, I thought it was still current.)  I pasted the LJ 886 Fireworks stencil with Translucent paste, which I covered in Stampendous glitters.   It took a long time to dry, even after I heated it with a heat gun.  Ultimately, I did not particularly like the look when I  was done, so I did not paste any others.


 The second piece represents Frontierland.  I used the LL 394 Feathers stencil, LL 430 Buck, LL 598 Grizzly, LG 715 Moose, LG 611 Stone Wall, LL 570 Pine Trees, and LG 675 Pine Cones.

And on my final project for today, I feature a Fantasyland themed project.  I used LL 493 Teacups Vertical, LS 6 Scallop, LM 186 Chameleon, LR 502 Sun, LJ 806 Hexagons, LJ 838 Waves and LJ 848 Fish Background.

Tomorrow, check back for the other sides of these pieces!  In the meantime, take a look at the fun inspiration our design teams have for you today! Be sure to leave your comments for a chance to win!
If you don’t see the Blog Hop post as soon as you click the link, you may need to click on the header or home button of the blog and scroll a bit to find the post. Some bloggers post for more than one thing each day. If you have trouble commenting on a blog, please let us know at submissions@stampendous.com. Thanks for your patience, designers across several time zones mean every post may not be active immediately.

Thursday, May 21, 2015

It's Picnic Time

Stampendous is having a picnic theme this week, so here is my response:

I decided to go with a picnic birthday theme.  I created all the dangling charms with Dreamweaver Stencils and shrink plastic.  First, I sanded the plastic, then traced the stencils with the Chameleon detail pen and colored them with various Chameleon alcohol inks.  I used my Big Bite to create the holes and then shrank the plastic with my heat gun.
The first picture is the LL3032 Lg Cherries.  I used the Chameleon Pens in Grass Green, Crimson Red, Spring Meadow, Bark, and Deep Black.


 The next picture was created with the LM193 Dragonfly stencil.  I used the colors Crimson Red, Grass Green, Sky Blue, Royal Blue and Deep Black.


 The final dangle was created with the LR502 Sun stencil.  It was colored with Summer Sun, Crimson Red, Warm Sunset and Deep Black.


After I made all the dangles, I attached everything with May Arts Ribbon.  That was it--and it was really fun!  After all, I got to play with shrink plastic.....it made me feel like I was 10 again.

More picnic fun can be found today by going to these links:


Enjoy this fun theme, and I will see you back here next week!


Thursday, May 14, 2015

Dreamweaver Art

Apparently, I have the world's SLOWEST mail service.  You see, Stampendous is having a blog hop with Clear Scraps that we, the Dreamweaver Specialists, could also get in on.  We were sent some Clear Scraps, but ours went out later than the rest of the team's.  EVERYONE got their goodies.  Except me........I still don't have them.  Therefore, today I am posting a project that does not include the Clear Scraps, but it does have an art theme.  Clear Scraps and Stampendous do encourage you to follow your art.....


For this card, I embossed the white card stock through my Cuttlebug Machine.  I used Stencil LJ 801 Splats and Stencil LG 761 Chunky Art Tools.  I placed them face down on the Cuttlebug A Plate, followed by the card stock, the Stamping Details Rubber Embossing Mat and two Cuttlebug B Plates.  I placed the corresponding stencil on top of the embossed card stock and used the Circus Splendor Ink Pad and my Black Soot Distress Ink Pad with my stencil brushes to add all the color.  I poured Stampendous Clear Embossing Powder over the image and heated it.  Wherever the pigment ink was still wet, it stuck and showed up glossy on the final image.


The silver portions were created by using Versamark with the stencil brush and covering it with Stampendous Silver Embossing Powder.  Of course, the Follow Your Art Stamp is from Stampendous and stamped with Versafine.  The ribbon is May Arts and the words and art supplies were raised with 3D foam.
The rest of the Dreamweaver Specialists are also posting today.  I included their links.  I also included a link to that blog hop that I mentioned earlier.

Meanwhile, as I have mentioned, the rest of the team is posting a great blog hop with Clear Scraps.  Under this great banner, you will find the link to one of today's posts.....and a great way to start hopping for wonderful prizes:

banner graphic2


Thursday, May 7, 2015

Dreamweaver and Stampendous Patriotic Week

My new team, Stampendous, is having a patriotic theme this week.  Of course, where else would my thoughts turn, but to the Dreamweaver Flag Stencil LL359 ?  The biggest challenge was to find a new way to use it.
Here is what I did:  I pasted LL 359, using Glossy White Embossing Paste on white card stock.  Because it was a narrow stencil, I was able to use the regular palette knife.  Once the paste was dry, I replaced the stencil and daubed on Versamark using a small finger dauber.  I poured on some Stamp N Bond and heated it.  While it was still warm, I pressed some foil into it.  I actually used some foil from an Easter Egg decorating kit on this, but I am sure that any of the heat and pressure activated foil out there right now would work.  WARNING:  You do need to work in small batches on this, or the glue will not remain hot enough to adhere the foil when it is pressed down.  Despite my best efforts, the foil still looked reticulated and patchy.  I was thinking afterward that it may have been a better choice to use a stencil brush to add the Versamark.  That way, it may have created a smoother surface for the foil.  I did not give up , however, and added a second coat to the empty parts.  Then, because it still wasn't covered in foil, I used my Chameleon markers to fill in any remaining white sections.  I then used Regular Embossing Paste to paste on the stars.  The surface was bumpy, so the stars did not turn out perfect.  I decided to be okay with that.
For the background, I used the Dreamweaver Fireworks Embossing Folder FJ886 on some navy color core paper.  I then lightly sanded the paper.  I placed the coordinating Fireworks Stencil LJ886 over the top and used the small dauber to add Versamark to the embossed areas.  I then covered the ink with Gold Tinsel and Silver Tinsel Embossing Powder.  Of course, when I was done, I heated up the embossing powder.
Take a close look at all the shine!
The oval was cut with a nested die and the Cuttlebug Machine.  I stamped the Thank You from the Happy Greetings Perfectly Clear Stamp Set with Majestic Blue Versacolor.  I used Versamark on the edges with Gold Tinsel Embossing Powder.  I punched a couple of holes in it.
Finally, I cut around the flag, added some May Arts ribbons, foam tape, and card stock and I was finished!

Now, there are a few more ladies playing with us today, so check them out:


Thanks for stopping by today.  I do love comments, so please leave one if you have a minute.