Thursday, May 29, 2014

Fifth Thursday

On months with fifth Thursdays, the entire Dream Team is going to post, and this is our first fifth Thursday of the term.  In keeping with this month's Flora and Fauna team, I am posting an easy floral thank you card.
Here is how it was made.....

MATERIALS:
Dreamweaver Stencil LX 7024 Zen Flower
Dreamweaver Stencil LS 1009 Thank You
Stamping Details Rubber Embossing Mat
Mercart Aluminum in Yellow
Mercart Basic Metal Tool Kit (or just Teflon Deer Foot Tool)
Color Solutions in Paprika Red
Color Solutions in Cosmo Pink
Large Stencil Brush
Fiberglass Erasing Brush (optional)
Scissors
Cotton Swabs
Paper Towels
Sanding Block
Card Stock
Adhesive
Manual Die Cut Machine (I used a Cuttlebug)

DIRECTIONS:

1)  Cut the aluminum to the size of the stencil with scissors.  Cut for each stencil.


2)  Place the stencil face up on the base of your die cut machine and cover with aluminum, yellow side up.

 
 3)  Cover with the rubber embossing mat and your top mats.  For the Cuttlebug, it goes A Plate, stencil, metal, rubber mat, and two B Plates.

 
4)  Run through the machine.

5)  Leaving the stencil in place under the metal, use the Mercart Teflon Tool (in basic kit) to "sharpen" the edges of the stencil wells and "draw" lines in the petals.

 
 6)  Drop a drop of Paprika Red Color Solutions in each well, leaving the innermost ones empty.

 
 7)  Use a cotton swab to move the color around the well.


 8)  Blot off any excess color with the paper towel.


 9)  Repeat steps 6-8 using Cosmo Pink in the inside petals, leaving the very innermost circles yellow.  You can put a little pink in some of the red areas.


10)  Lightly sand over the top of the project.  You will be removing color from the outlines of the petals, the uppermost parts of the lines inside them, and the background.

 
 11)  You can use the fiberglass brush to clean out any additional areas that you would like to leave silver (OPTIONAL).

 
 12)  Use the brush to remove all the powder remaining from the sanding.

 
13)  Repeat steps 1-5 with the Thank You stencil, then sand well.

14)  Carefully remove the metal from the stencils and assemble the card.

 
I hope you enjoyed my Fifth Thursday post.  Check out the other posts this week and get inspired.  If you link up your Flora and Fauna creation to the Dream It Up! blog, you could win a prize.

Thursday, May 22, 2014

All New Designs!


The Dream Team is ready to inspire you with some extra fun this week! Not only are we posting with the Flora and Fauna challenge, we are introducing you to our THREE NEWLY RELEASED DESIGNS...our Owl Buddy, the Open Sheep, and the art nouveau-inspired Heron, which you had a sneak peek at two weeks ago on the Dream It Up! blog. Three lucky commenters on the Dream Team's posts will receive one of these designs to be announced on the Dream It Up! blog next week. Tell us in your comment which technique YOU would use with your favorite of these new designs.

Here is what I created this week...
 
 
You may ask yourself, "What, no metal?".  Yep....I wanted to do something different this time.

MATERIALS:
Dreamweaver Stencil  LX7002 Plaid
Dreamweaver Stencil  LL3040 Open Sheep
Dreamweaver Stencil  LS22 Congratulations
Dreamweaver Paste Spreader LM2010
Palette Knife
Removable Tape
Dreamweaver Regular Embossing Paste
Splendor Ink Pad in Circus
Stencil Brush
Color Solutions in Black Beauty
Craft Mat
Hero Arts Gemstones
Cotton Swab
Black or Gray Acrylic Paint
Cotton Balls
Paper Towel
Card Stock
3D Dots
Adhesive

INSTRUCTIONS:

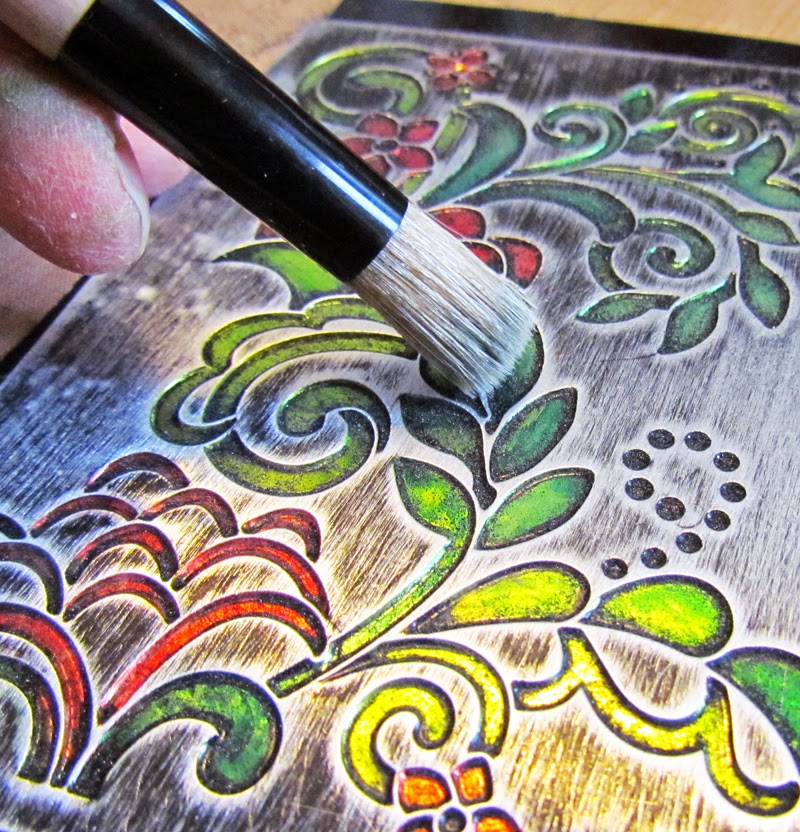
1)  Tape the stencil over the top of the light card stock.
2)  Tap the stencil brush into the color you want from the Splendor pad to pick up some ink.

 
3)  Tap the brush on the paper towel to remove excess ink.

 
4)  Rub the color on over the card stock in a light, circular motion.

 
I left the color a little "splotchy" because my intent was to have a soft background for my soft little lamb.

 
5)  Pull a little cotton off the end of the cotton swab and place a couple of drops of Color Solution on it.

 
6)  Tap the color solutions on one end of a gemstone to add an "eyeball".  This will take about three coats to become opaque.  Let the color dry for just a moment between coats.

 
7)  Place just a little black or gray acrylic paint on your craft mat.

 
8)  Place a "blob" of embossing paste over the top of the color and mix well with the palette knife.  Adjust the color with paint or paste until you get it "just right".


9)  Place the lamb stencil over the top of the striped card stock and tape down well with removable tape.  Make sure that nothing that you want to leave striped is exposed.

10)  Use the LM 2010 to pull the paste across the stencil.

 
11)  Carefully remove the stencil, using one taped edge as a "hinge" while you lift it.

 
12)  While the paste is still wet, pull apart the cotton balls and gently press the pieces into place.
 
13)  Also, while the paste is still wet, place the gemstone "eyeballs" into place.  Let the paste dry.


 This is what the lamb looks like finished. 
 
 
14)  Paste the Congratulations stencil with embossing paste on a darker cardstock and let dry.

 
15)  Assemble the card, using the 3D dots to raise up the word. 
 
Here is another quick look.
 
 
Thanks for checking out my post.  Don't forget to comment for your chance to win some stencils!


Ready for more ideas? Check out our this week's team players:


Thursday, May 15, 2014

The Flora and Fauna Challenge Continues.....

It's May! The Dream Team members are challenging you this month to a "Flora and Fauna" theme! Considering most of the Dreamweaver designs incorporate these themes, you should have no problem playing along with our challenge this month! As usual, link your creations at the end of the Dream It Up! blog post.  As the challenge gets underway, you'll see thumbnails of others who are playing along as inspirations for your own creations!

Here in Michigan, the weather has been stormy and hot, although later this week it is going to cool down again.  Typical for a Michigan spring.....  The weather, however, has gotten me thinking about summer, so I thought I would share a little summer card with you.


I made it with metals.  As my regular followers know, I am BIG into the metals.  They are so much easier to use than they appear.  Check it out with my tutorial on the goldfish.
 
MATERIALS:
 
A Small Piece of Suede
Scissors
Manual Die Cut Machine
Sandpaper
Cotton Swabs
White Card Stock
Adhesive
 
INSTRUCTIONS:
1)  Cut the metals to just larger than the stencils:  blue for the scales and gold for the swirls and the summer stencil.
 
2)  Run the metals through the die cut machine with the metals and the rubber mat.  I have a Cuttlebug, so I used an A Plate, stencil, metal (face up), rubber mat and two B Plates.  Leave the stencils under the metals.
 
3)  Use the Teflon Tool (found in the Beginners Kit) to press in and "sharpen" the word summer.
 
3)  Use a cotton swab to add a little Pumpkin Color Solutions over parts of the gold swirls and into the word summer.  Let it dry (this should only take a minute or so).
 
4)  Sand the blue scales and the gold/orange swirls and word summer with the stencils underneath.  After you are done sanding, you can remove the stencils.
 
5)  Run the gold/orange metal through the die cut machine with the goldfish stencil.


 6)  Place the goldfish face down on a piece of suede and "push" the metal out with the Ball Tool (found in the beginners tool kit).

 
 You are shaping the fish.  Be sure to use the Metal Ball Tool to enhance the shape with your own flair.  I like to add some "ruffles" in the tail.

 
 7)  Once the shape is the way you like it, flip the metal back over and place on a die cut machine plate or another smooth, flat surface.  Use the small end of the Teflon Tool (found in the beginners kit) to "sharpen" areas of the fish.

 
 8)  Use the "Deer Foot" end of the Teflon Tool to flatten the outside of the fish.

 
 9)  Flip the fish back over and fill with the Mercart Filling Paste.  Let it dry.  This will take a couple of hours.  It will be hard when done.

 
 10)  When the hardener is dry, use cotton swabs and the Color Solutions to enhance the colors.

 
11)  Trim around the outside of all the metal pieces with scissors. 
 
12)  Assemble the card.


Thanks for stopping by.  I hope to have inspired some people to use metals.  It is reall easy and great fun!

Be sure to check out all the other "A" Team members this week--and leave us a little love! 


Thursday, May 1, 2014

Dreamweaver Flora and Fauna

It's May! The Dream Team members are challenging you this month to a "Flora and Fauna"theme! Considering most of the Dreamweaver designs incorporate these themes, you should have no problem playing along with our challenge this month! As usual, link your creations at the end of theDream It Up! blog post.  As the challenge gets underway, you'll see thumbnails of others who are playing along as inspirations for your own creations! Speaking of inspirations...the month of April was our Inspirations month, and we had many that linked with us! So exciting! Our randomly chosen winner for April is...JULIE STAVES! Check out two of her creations...
 
Congrats, Julie! Be sure to email lynell@dreamweaverstencils.com with your choice of stencil, and your address!
Now here is my creation for this week:
 It was pretty simple to make, and I took lots of pictures, so here is my tutorial:

MATERIALS:
Dreamweaver Stencil LJ 927 Floral With Dots
Black Coated Mercart Aluminum
Stamping Details Rubber Embossing Mat
Color Solutions Thinner
Color Solutions in these colors: Mojito, Pine Bough, Paprika Red and Winter Red
Mercart Deerfoot Teflon Tool (in Beginner Kit)
Large Stencil Brush
Scissors
Manual Die Cut Machine
Q Tips
Sanding Block
Adhesive
Hole Punch
May Arts Ribbon
Card Stock

DIRECTIONS:
1)  Place the stencil on top of the metal and trim around the outside with scissors.  Leave just a little extra metal.

 
 2)  Place the stencil on the manual die cut platform and then add the stencil, face up, the metal, face up, the rubber mat and your normal embossing top mats.  I use a Cuttlebug, so my "sandwich" is A Plate, stencil, metal, rubber mat and two B Plates. 

 
3)  Run through the machine.  Do NOT remove the stencil from behind the metal.

4)  Use the pointed end of the Teflon tool to further define the wells created by the stencil.  You can see in this picture how the bottom of the well appears sharper than the top part.  I accomplished this by pressing the metal up against the edge of the metal stencil.

 
 5)  Place a single drop of the Color Solutions Thinner in each well when necessary and clean out the black with a Q Tip.  Do not worry about going outside the stencil well, as the sanding step will hide all mistakes.

 
 This is what it looks like when it is cleaned out.

 
 6)  Place a drop of Color Solutions Alcohol Ink on the tip of a Q Tip and rub into the clean wells to color them.  The Color Solutions are nice and vibrant and should only take one coat to make a nice color, but feel free to add additional coats if you would like to.  Also, do not worry about mistakes on this one because, once again, the sanding should take care of it.

 
 This is what mine looked like colored.

 
 7)  Sand off some of the black.  if you want to leave some "scratchy" black marks like I did, be sure to always go in the same direction.

 
 8)  Use a large stencil brush to brush off the dust you created with the sanding.


9)  Trim any extra metal and assemble the card.


Thanks for stopping by.  I hope you enjoyed the tutorial.
Please welcome our new "A" team, officially posting for the first time!